
Flowering and pollination
6. Flowering and seed production—general recommendations and comments; instructions for self-pollination and crosses.
General recommendations and comments: FPsc plants commence flowering at about 18 days after planting/germination. Flowers are comprised of 4 concentric whorls of discrete organs: 4 sepals enclosing 4 symmetrically arranged bright yellow petals, 6 stamens (4 long and 2 reduced) and a central pistil (itself comprised of 2 carpels; figure 8). Healthy plants produce ~3 new flowers/day and flowering proceeds vigorously for ~5-7 days under standard growing conditions. Pollen grains produced and shed from the distal ends of stamens (the anthers) will germinate if deposited on the stigmatic cells of the pistil of the same or other FPsc plant. 15-25 haploid ovules reside within the interior of the pistil; germinated pollen forms fertilization tubes that burrow through pistil tissues, find and invade the ovules, and deposit gametes to effect fertilization. Embryogenesis/seed development ensues and is complete in 3-4 weeks. During the course of seed formation, the carpels elongate and enlarge radially to accommodate the growing embryos. Small, lumpy protrusions will become evident indicating the location of incipient seeds. Approximately 3 weeks after fertilization, leaf tissues of the plant will show signs of senescence, losing their previous green color and turgor. Initially the carpels remain green and are likely the sole site of photosynthesis during late stages of the plant life cycle. Ultimately, however, the senescence program spreads to the carpels. Initial signs are browning of the “beak”—the pointy tip of nearly mature seed pods. That browning soon spreads through the carpels as well. At approximately 5 weeks from the onset of flowering, FPsc plants are fully brown and, well… dead. Seeds may be harvested by cracking dried pods open and capturing in a suitable container.
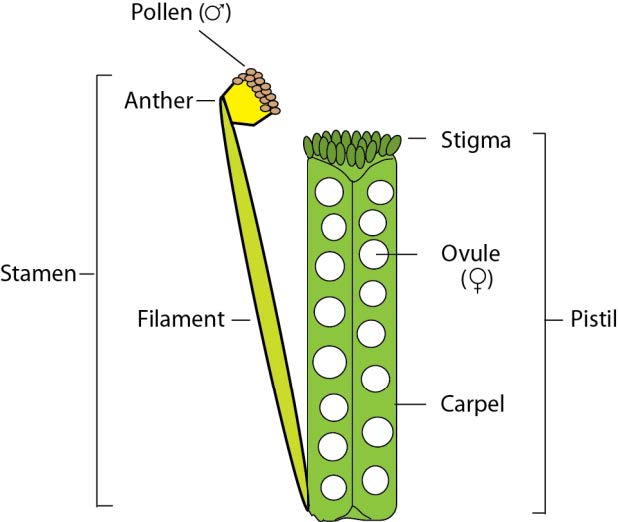
Figure 8: Schematic representation of floral reproductive organs (sepals and petals in the outer whorls not shown).
Self-pollination: The FPsc variety is readily selfing. Left unattended, FPsc plants attain ~50% of the maximal seed yield that can be realized through supplemental hand-pollination. This capacity, an intended outcome of our breeding program, was enabled by selection early in the program for lines that had lost (or otherwise did not inherit) the genetic self-incompatibility mechanisms carried by some of the founding lines. However, there is more to self-fertility than mere absence of self-incompatibility; developmental and anatomical aspects of flowers are important, too. In most naturally-occurring plant lines that reproduce exclusively via self-pollination, evolution has produced a well-choreographed developmental dance between male and female reproductive parts (stamens/anthers and pistils, resp.). In the model plant species Arabidopsis, for example, the stamens grow adjacent to the pistil but are slightly longer early in flower development and thus position the anthers (the site of pollen production) just above the stigma atop the pistil. Furthermore, the pollen-shedding (or dehiscent) surface of the anthers faces inwards. As the pistil ultimately outgrows the anthers, the stigma pushes through erupting masses of pollen grains, easily leading to fertilization of all ovules within the pistil. The FPsc variety lacks such elegant choreography—sometimes the anthers face inwards, sometimes out. The close proximity of anthers and pistil ensure that some pollination will take place spontaneously, but to ensure maximal seed production it is helpful to hand-pollinate. Your students will also benefit by close examination of floral anatomy and the mechanics of pollination.
Hand pollination is pretty simple, but some additional background on plant reproductive biology might be useful to consider before giving you the ‘how-to’; it may be useful to have a flowering plant to look at or you can refer to the figures. First, notice that flowering proceeds with sequential maturation and opening of successive flower buds. In our B. rapa line, 2-3 flowers open per day. Now also notice that the oldest flowers—the ones that opened earliest, are ‘left behind’ on the growing inflorescence stem. So regular is the pattern of flowering that merely by counting “down” from the most recently opened flower, one can estimate how old a particular flower is simply by noting its relative position on the stem. The last thing you need to know is that pollen grains are not indefinitely viable under normal growing conditions. For instance (and this is admittedly offered with no evidence but is probably true), it’s likely that exposure to the air and ambient temperature causes dehydration and “death” of pollen grains in a fairly short time after flowers open. Alternatively, or in addition, pollen grains are actually autonomous haploid organisms whose developmental program may have evolved to proceed to senescence and death unless germination is the triggered by contact with receptive cells atop a compatible pistil. In any case, pollen grains are mostly unviable by about 4 days after anthesis (the ‘ripe’ stage when flowers are freshly opened). Finally, and somewhat contrary to the preceding, we have found that pollen grains can retain viability for several (4-6) months if protected from dessication and stored at low temperatures. We occasionally take advantage of this property in our experiments—for example, to store pollen from a flowering plant in order to conduct pollination at a later date. We use a bee stick to gather pollen, place it in a small sealable tube and store it in the refrigerator until needed.
So now, the ‘how-to’: using a pair of fine-tip forceps, grasp around the base of a 2-3 day old flower. Holding the stem between thumb and forefinger of one hand, squeeze it near the base and pull to remove it from the plant. With any luck that gentle squeeze should cause the stamens to splay outwards from the pistil, exposing the anthers (which should have fluffy mounds of pollen on them). Invert the detached flower and simply touch the anthers to pistils of successively younger open flowers. If you look closely, you should see clumps of pollen that were deposited on the stigmas. If you can’t, you may have picked too-old a flower so try again. With a little practice you’ll find that a single flower can ‘service’ 5-6 younger ones (keeping in mind that your pollinating flower is probably picking up about as much pollen as it deposits along the way, thereby replenishing its supply).
Crosses: In principle, crosses are no different than self-pollination—the goal remains to deposit pollen from a given source plant “father” onto the pistil of the intended “mother” plant. The devil is in the details, so let’s cover those first. The biggest challenge in crossing with FPsc is to avoid inadvertent self-pollination. This is possible through emasculation (removal of immature anthers) from young flowers but that raises the second biggest challenge: to avoid killing flowers in the course of emasculation.
Theory and mechanics of successful emasculation. The essential task is to remove some or all of the floral organs that surround the innermost whorl (the carpels) without damaging the pistil itself. Specifically, you want to remove the pollen-bearing stamens but it’s simpler and perhaps even necessary in doing so to remove parts or all of the sepals and petals. The general approach is to use fine-tip forceps to sever outer whorl organs until enough are removed and you are able to excise the immature anthers. Thus, identify the oldest unopened flower; grasp the inflorescence stem just beneath the cluster of immature flower buds and twist gently, if necessary, to give yourself good access to the targeted flower. It’s useful at this point to remove some of the adjacent and older flowers on the same plant. The end goal of emasculation is to engineer an exposed pistil ready for pollination by your intended father plant and you don’t want to risk inadvertent self- or cross-pollination by grains drifting in from other sources.


Figure 9: Initial steps in emasculation of flowers. Note—sharp and straight forceps make the job much easier. Take care to use a Kleenex or other absorbent material to clean forceps tips prior to emasculation in order to avoid introduction of unwanted pollen grains.
Now here’s where it gets a bit tricky. Push the straight, sharp tip of your forceps against the flower. You should aim to have the tips just flank the lateral edges of a sepal at a position ~1/3 of the way from the base of the flower; higher doesn’t hurt but will likely limit access in later steps and require more ‘bites’. Lower is BAD since all organs are joined at the base and you risk damaging the pistil in the next step. Flex the tips to gain some degree of purchase on the sepal and perhaps more interior organs—not too far, don’t pierce the pistil!—and then SQUEEZE to sever the clutch of organs in your grasp. DO NOT PULL!!! It should be a decisive snip and if that’s not enough to separate the distal portions of the sepals/petals, reposition forceps and take another bite. If you find yourself yanking on the flower you may as well abandon hope, she’s a goner. Repeat the process until you begin to gain access to the stamens (remember, there are 6 of them). Ultimately your goal is to snip off the anthers from each, easily done by clipping the thin shaft of the stamen. With patience and practice this can be done routinely. [I apologize for all of the BOLD text and exclamation pointed warnings in the preceding, but it took us a while to figure out how to avoid damaging flowers in the course of emasculation and I want to spare you the experience. The bottom line is that there seem to be at least two key pitfalls: stretching organs and stressing their confluence at the base, and avoiding any other damage to the pistil. Do either of those to excess and you will almost certainly visit your flower in several days, filled with hope and anticipation, only to find it withering away at the end of its pedicel.]


Figure 10: Completing emasculation of flowers. The exposed pistil should be pollinated as quickly as possible in order to reduce chances of inadvertent fertilization via air-borne pollen grains.
Now things get easy. Once you’ve (gently) removed outer organs and anthers you should be left with an exposed pistil ready for pollination. Pollination for crosses is just like pollination for selfing except the flower is taken from a different plant. Remove a flower from the intended father, squeeze to splay-out anthers, and then dab pollen onto the pistil of the mother flower. Be sure to label the flower that you’ve crossed onto. It’s tempting to think that you’ll be able to distinguish it from adjacent, unemasculated flowers and that’s true—for about three days. After that, however, those other flowers naturally lose their outer organs and come to look just like the one you crossed onto. We use colored sewing thread to mark the pedicel of an out-crossed flower and different colors if multiple but distinct crosses were performed on several flowers of a given plant. Take a 1 ½-2” piece of thread and tie a loose overhand knot. Grasp the intertwined threads with your forceps, niggle it over the flower and down onto the pedicel. Holding one end with your fingers and the other with the forceps cinch it up—obviously not too tightly but tight enough that it won’t fray and fall off in a passing breeze.


Figure11: Use forceps to grasp the flower to be used for pollination at its base—the organs will splay out to expose anthers (left). Remove the flower from its pedicel, invert, and brush the pistil of an emasculated flower to leave a thorough coating of pollen (center). Use colored thread tied loosely around the pedicel to demark the crossed flower (right)
A couple of additional points are worth noting here. First, in some cases you may be able to bypass emasculation altogether by pollinating exposed pistils that sometimes emerge from young flowers. Whether it’s mere chance or some unknown variable in the growing environment, exposed pistils sometimes do present themselves. If close inspection shows no signs of pollination, lathering on a saturating coat of pollen seems a reasonable thing to do: the applied non-self pollen grains will have a considerable head start over the self pollen grains released later and in any case should block access to surface cells of the stigma. We’re not recommending this, we’re just sayin’…. Second, and somewhat related, professional breeders typically ‘hood’ their crossed flowers to prevent unintended pollination by either self pollen or any other source that may be in the vicinity. This is undoubtedly good practice but probably overkill in most classroom situations for which we expect our line will have most use. Our reasoning is as above—provided that you coat pistils with sufficient pollen from the intended donor, the head start and occupancy achieved should be sufficient to minimize/eliminate the possibility of unintended crosses.
Finally, it’s also worth considering the strategy of designing crosses to minimize or enable detection of unintended matings. The biggest concern in most cases is harvesting seeds and growing plants that result from inadvertent self-pollination. For example, if you were to take pollen from a recessive mutant and use it in a cross to a wild type FPsc mother plant, the F1 plants would look wild type regardless of whether the seeds were the result of the intended cross or an inadvertent self-pollination. On the other hand, had we thought more strategically, it’s easy to tell the difference if the cross was reversed: use pollen from wt FPsc to fertilize ovules of a homozygous mutant mother plant. If the F1 are from the intended cross they’ll be wild type, if they’re from an inadvertent self of the mother plant, they’ll be phenotypically mutant (obviously this only works if the mutant allele is recessive). Sometimes this strategic decision is not practical—some mutant plants are feeble and largely incapable of bearing seeds of any sufficient quality or quantity—so you have to keep issues regarding fecundity in mind, as well.